

1 · Find the start
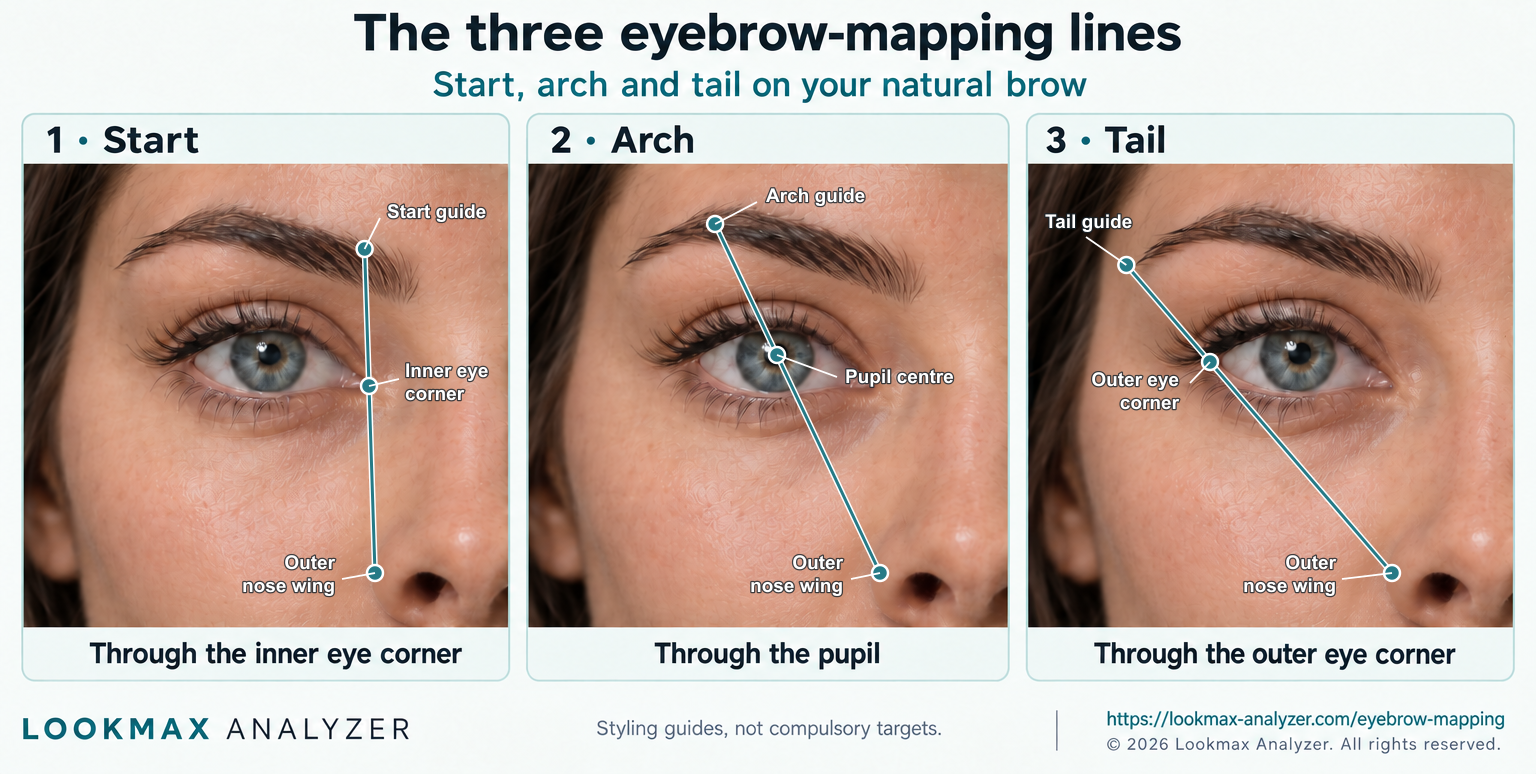
From the outer nose wing, where it meets the cheek, draw through the inner corner of the eye and continue to brow height. Compare the visible brow start with that line.
Free eyebrow mapping tool
See start, arch and tail guides on your own photo. Move the markers to match the visible brow hair, compare each side, and save your map.
Free · On your device
Face the camera squarely, relax your brows, look toward the lens, and move hair away from both brows. Use even light and keep both eyes open.
JPG, PNG, WebP or HEIC · Up to 30 MB. Your photo and edits stay in this browser.
Eyebrow mapping uses facial reference points to sketch where a brow could start, arch and end before shaping or styling. The three pencil lines help compare placement with the eyebrow hair you already have.
This free eyebrow mapping tool draws those guides on your photo and lets you adjust the markers to match visible brow hair. Mapping conventions vary; this version uses the outer nose wing and pupil centre. The lines are a starting point for choosing a shape that suits your natural growth and preferences.
The lines share an outer nose-wing anchor and pass through three eye landmarks. Use them to understand placement, then choose a shape that works with your natural brow hair.
Attribution does not grant reuse rights. Read the image reuse terms.
From the outer nose wing, where it meets the cheek, draw through the inner corner of the eye and continue to brow height. Compare the visible brow start with that line.
From the same outer nose-wing anchor, draw through the pupil while looking toward the camera. Compare the arch marker with this optional styling guide.
From the same outer nose-wing anchor, draw through the outer eye corner. Compare where the visible brow tail ends with the extended guide.
The map uses relative geometry. These styling guides do not establish an ideal shape or physical millimetres; choose a shape that works with your natural brow hair.
Facial landmarks approximate the brow ridge, so they may miss the edge of real eyebrow hair. Inspect the automatic markers before using the map. Your natural growth, preferred style and a brow artist’s advice matter more than matching a line.
Choose a level photo with relaxed brows and open eyes.
Select a guide and correct its marker if needed.
Download the current map to keep or discuss with your stylist.
Turned heads, shadows, glasses that obscure the eyes, hair over the brows, raised eyebrows and heavy brow makeup can change the map. Retake when these hide the natural anchors.
In this tool, all three lines share an outer nose-wing anchor, where the side of the nose meets the cheek. The start line passes through the inner eye corner, the arch line through the pupil centre, and the tail line through the outer eye corner. These are optional styling guides, not anatomical requirements.
Yes. Drag the start, arch and tail markers onto your visible eyebrow hair, or focus a marker and use arrow keys. Reset returns to the detected landmarks. Edits apply only to this map.
No. Each offset is divided by the width of the same eye. This relative measurement needs no assumed iris size or physical ruler. A positive offset points toward the temple and a negative offset toward the nose.
No. Face detection, marker edits and PNG export run in your browser. This tool does not send your photo or map to an analysis server.